• Make an Appointment
  • FAVOURITES
  • Track My Order
Thomasville
Thomasville
  • Get Started
  • Our Products
  • Inspiration
  • Project Assistance
  • Resources
  • Menu
  • Literature Downloads
  • Video Library
  • Frequently Asked Questions
  • Back
  • Back
  • Back
  • Menu
  • Find Your Style
  • Plan Your Project
  • Design Your Room
  • Install Your Cabinets
  • Love Your Space
  • About Thomasville
  • Back
  • Casual
  • Contemporary
  • Rustic
  • Traditional
  • Learn More
Get Inspired
  • Back
  • Measure Twice
  • The Thomasville Family
  • Visiting the Home Depot
  • Living Through Your Remodel
  • Remodeling Checklist
  • Learn More
Book a FREE Design Consultation
  • Back
  • Kitchen Cabinets
  • Bathroom Cabinets
  • Choosing a Material
  • Design 101
  • Cabinet Construction
  • Cabinet Trends
  • Learn More
  • Must Have Organization
Room Visualizer
  • Back
  • Preparing for Construction
  • Working with Your Installer
  • Learn More
Download Planning Guide & Grid
  • Back
  • Care and Cleaning
  • Touch-Ups
  • Adjustments
  • Warranty
  • Learn More
Download Care and Cleaning Guide
  • Back
  • The Thomasville Story
  • Our History
  • The Home Depot Connection
  • Sustainability
  • Learn More
Limited Lifetime Warranty
  • Menu
  • Door Styles
  • Finishes
  • Organization
  • Embellishments
  • Appliance Cabinets
  • Specialty Cabinets
  • Specialty Doors
  • Hardware
  • All Products
  • Back
  • View by Finish
  • View by Style
  • View by Collection
  • View All Door Styles
  • Most Popular Styles
View Painted Shaker
  • Back
  • View by Finish Type
  • View Hardwoods
  • View Specialty Hardwoods
  • View Alternative Materials
  • View by Collection
  • View All Finishes
  • Most Popular Finishes
Painted Looks
  • Back
  • View by Cabinet Type
  • View by Room
  • View by Storage Need
  • View by Collection
  • View All Organization
Everyday Essentials
  • Back
  • View by Type
  • View by Collection
  • View All Embellishments
Moulding Stacks
  • Back
  • View by Type
  • View by Collection
  • View All ApplianceCabinets
Warming Drawer
  • Back
  • View by Type
  • View by Collection
  • View All Specialty Cabinets
Pantry Walk through Cabinet
  • Back
  • View by Type
  • View by Collection
  • View All Specialty Doors
Cabinet with Frost Glass
  • Back
  • View by Type
  • View by Finish/Colour
  • View by Collection
  • View All Hardware
View All Knobs & Pulls
  • Back
  • View All Product Categories
  • Menu
  • Room Visualizer
  • Inspiration Gallery
  • Back
  • Back
  • Menu
  • Order a Sample
  • Back
  • search
  • Back to Get Started Landing Page

Get Started

Get Started

Remodeling Checklist
  • Find Your Style
    • Casual
    • Contemporary
    • Rustic
    • Traditional
  • Plan Your Project
    • The Thomasville Family
      • Nouveau Collection
    • Measure Twice
    • Visiting The Home Depot
    • Living Through Your Remodel
  • Design Your Room
    • Design 101
    • Choosing a Material
    • Standard Finishes/Colours, Glazes and Colours
    • Finishing Techniques
    • Order a Sample
    • Must Have Organization
    • Cabinet Construction
      • Classic Cabinet Construction
      • Nouveau Cabinet Construction
    • Moulding and Accents
    • Modifications
    • Choosing Hardware
    • Cabinet 101
    • Kitchen Cabinets
    • Bathroom Cabinets
    • Other Room Cabinets
    • Working with a Designer
    • Green Guide
    • Trends
  • Install Your Cabinets
    • Working With Your Installer
    • Preparing for Construction
  • Love Your Space
    • Care and Cleaning
    • Touch-Ups
    • Adjustments
    • Warranty
      • Commercial Warranty
adjustmentsheader

Learn How to Adjust Your Cabinet Hardware

  • print
  • Share

ADJUSTMENTS

Create Your Best Look

From time to time, your kitchen cabinets may require adjustment to ensure proper alignment and function. Keep a Phillips head and slotted screwdriver available to make these simple adjustments.

Decorative Hardware and Hinges

  • Prior to installing decorative hardware, adjust all doors and drawers to ensure proper alignment.
  • Loose decorative hardware – Your hardware can become loose from frequent use. Simply use the appropriate screwdriver based on the screw head type to re-tighten any loose hardware by turning the screw clockwise.
  • Loose door hinges – Use a Phillips head screwdriver to tighten any door hinges that might have come loose. Locate the screws used to fasten the hinge to the face frame and tighten by turning clockwise.

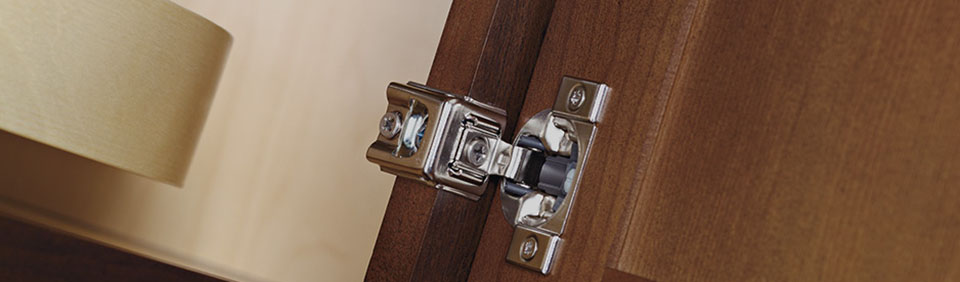
Door Alignment and Function

  • Doors can be adjusted up and down by slightly loosening the screws used to fasten the hinges to the face frame. Once the screws are loose, move the door to its proper location and hold in place while you re-tighten the screws. Be aware that, sometimes, screws are hidden beneath a cap that will first need to be removed prior to adjustment.
  • Most doors can be adjusted side to side to close or open the gaps between doors. Use a screwdriver to adjust the screw typically found on the hinge arm that attaches the cup portion found in the door to the plate found on the face frame.  Adjust the screw and close the door to view the adjustment made. Fine-tuning this adjustment may take a few tries.
  • Most doors can also be adjusted in or out to bring the door closer or further away from the face frame. Use a screwdriver to adjust the screw that is typically found on the hinge plate towards the inside of the cabinet.

Drawer Alignment and Function

Most Thomasville cabinets use drawer slide hardware that is adjustable.  If you pull out a drawer and do not see any visible slide hardware, this indicates the use of under mount hardware that can be adjusted.  Height can be adjusted on both sides by positioning yourself to see the underside of the drawer box to locate the slider tab on the drawer’s locking device. Once located, slide the tab towards the back of the drawer to raise that side of the drawer.

Adjustable Shelves

Adjustable shelves can easily be adapted to accommodate different heights of cabinet contents.  Simply remove the shelf by lifting one side off the shelf clips. Remove the shelf clips by twisting and pulling outward. Plug the shelf clips into the desired location and replace the adjustable shelf.

Roll Out Tray

Thomasville features roll trays that are adjustable in the applied cabinet. Empty the roll tray and remove them by fully extending the tray and then reaching on the underside to disengage the locking devices.  Re-adjust the roll tray wood suspension system to the desired location. Re-install the roll tray by pulling out the slides and then sliding the roll tray box back onto the slides until they engage.

Installation Guide

For more information regarding adjustments, view our Installation Guide.

Thomasville
Privacy choice Your Privacy Choices

Get Started

  • Remodeling Checklist
  • Find Your Style
  • Plan Your Project
  • Design Your Room
  • Install Your Cabinets
  • Love Your Space
  • Thomasville Experience (PDF, 9.2 MB)

Our Products

  • Product Galleries
  • Thomasville Brochure (PDF, 12MB)
  • Look Book English - Organization Edition (PDF, 1.79MB)
  • Look Book French - Organization Edition (PDF, 1.89MB)
  • Cabinet Reviews

Resources

  • THD Store Finder
  • Frequently Asked Questions
  • Literature Downloads
  • Video Library

About Thomasville

  • The Thomasville Story
  • Our History
  • The Home Depot Connection
  • Quality and Sustainability
  • Limited Lifetime Warranty

Assistance

  • Sitemap
  • Privacy Statement
  • Do Not Sell My Data
  • Legal
  • MasterBrand, Inc.
  • Contact Us

Regulatory

  • CA Supply Chain Act Compliance
Thomasville
Thomasville

© 2025 MasterBrand Cabinets, LLC

Top